Beranda
/ Putting Up A Tile Backsplash - How To Install Backsplash Tile The Diy Playbook / This could be a wall, a window, a cabinet edge, or anything else in between.
Putting Up A Tile Backsplash - How To Install Backsplash Tile The Diy Playbook / This could be a wall, a window, a cabinet edge, or anything else in between.
Insurance Gas/Electricity Loans Mortgage Attorney Lawyer Donate Conference Call Degree Credit Treatment Software Classes Recovery Trading Rehab Hosting Transfer Cord Blood Claim compensation mesothelioma mesothelioma attorney Houston car accident lawyer moreno valley can you sue a doctor for wrong diagnosis doctorate in security top online doctoral programs in business educational leadership doctoral programs online car accident doctor atlanta car accident doctor atlanta accident attorney rancho Cucamonga truck accident attorney san Antonio ONLINE BUSINESS DEGREE PROGRAMS ACCREDITED online accredited psychology degree masters degree in human resources online public administration masters degree online bitcoin merchant account bitcoin merchant services compare car insurance auto insurance troy mi seo explanation digital marketing degree floridaseo company fitness showrooms stamfordct how to work more efficiently seowordpress tips meaning of seo what is an seo what does an seo do what seo stands for best seotips google seo advice seo steps, The secure cloud-based platform for smart service delivery. Safelink is used by legal, professional and financial services to protect sensitive information, accelerate business processes and increase productivity. Use Safelink to collaborate securely with clients, colleagues and external parties. Safelink has a menu of workspace types with advanced features for dispute resolution, running deals and customised client portal creation. All data is encrypted (at rest and in transit and you retain your own encryption keys. Our titan security framework ensures your data is secure and you even have the option to choose your own data location from Channel Islands, London (UK), Dublin (EU), Australia.
Putting Up A Tile Backsplash - How To Install Backsplash Tile The Diy Playbook / This could be a wall, a window, a cabinet edge, or anything else in between.. Grout it, clean up, and enjoy. Eventually, on edges that butted up to a cabinet or window where tiles needed to be cut to fit, we ended up leaving an uneven gutter and assumed it wasn't a big deal since we'd be filling the gaps with grout or caulk later. You could also use a creative edge design, such as tapering a set of hexagon tile away. You may end up with a warped finished result, if you can get the tile to stick at all. The first tile will make the base for the rest of your backsplash, so it needs to be placed perfectly.
What we underestimated was just how thick some of those gaps were, which. Cover the countertop with plastic sheeting held in place with masking tape. Beautiful and functional, a tile backsplash can pull together a kitchen design. Check the tile size against the wall and sand rough edges with sandpaper or a pumice stone. Although it's a great diy project, if you've never installed tile before (and even if you have) you may run into some complications.
How To Install A Simple Subway Tile Kitchen Backsplash Youtube from i.ytimg.com This area of the kitchen measures approximately 30 square feet on average. Eventually, on edges that butted up to a cabinet or window where tiles needed to be cut to fit, we ended up leaving an uneven gutter and assumed it wasn't a big deal since we'd be filling the gaps with grout or caulk later. You could also use a creative edge design, such as tapering a set of hexagon tile away. Using a measuring tape, measure the length and the height of the wall then multiply these two to get the total area. Make sure the tile is lined up properly and perfectly straight before moving on. Use liquid nails, and pay attention to the spacing to see if your tile and grout lines show through. Backsplashes placed near the cooking range typically go all the way up to the bottom end of the overhead cabinets. Joint between sheets of tile (you don't need spacers).
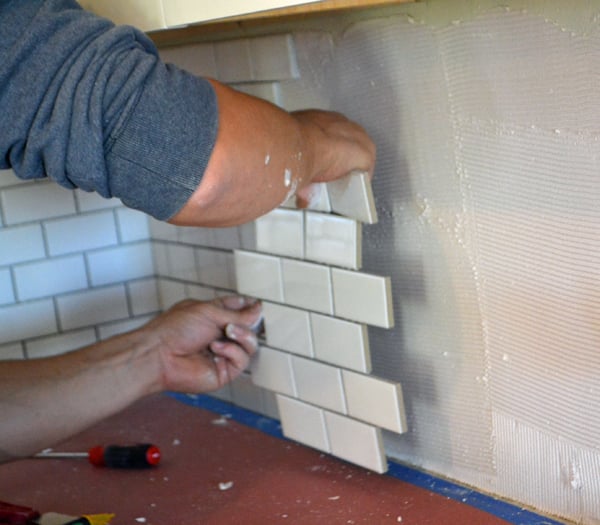
Texture it with a notched trowel to create a surface for proper adhesion.
Apply loctite power grab all purpose construction adhesive to the back of a tile, drawing a light x through the middle. Make sure the tile is lined up properly and perfectly straight before moving on. Starting in the center, use a putty knife to apply just enough tile mastic to attach one tile to the wall. Cover the countertop with plastic sheeting held in place with masking tape. Installing a mosaic tile backsplash is a great way to upgrade the look of your kitchen on a budget. Slightly rock the sheet up and down, perpendicular to the trowel lines, to collapse the ridges and help the tile settle into place. Continue this process until you've covered the majority of your drywall with complete tiles. Add tile spacers for help keeping the tile pieces lined up. No need to mess with mixing grout, wiping it clean, making a mess. Mark off an area of the same size and shape on the floor nearby. Prep your wall for tile with ease. How to install a simple subway tile kitchen backsplash. You'll save even more if you do it yourself instead of paying the labor costs of professional installation.
The materials you need to have prepared before you begin include your tile, tile adhesive, and grout. Separate your tiles with 1/8 inch (.32 cm) tile spacers. 1) prepping the wall, 2) creating a layout, 3) attaching the tiles, and then 4) applying the grout and finishing. You can use tile edging trim or bullnose tile to create a distinct edge for the backsplash. Place the tiles gently and remove them quickly if you put them in.
17 Subway Tile Backsplash Installation Tips Renos 4 Pros Joes from www.renos4prosandjoes.com You could also use a creative edge design, such as tapering a set of hexagon tile away. Beautiful and functional, a tile backsplash can pull together a kitchen design. After every two or three installed sheets, tap them into the mastic with a board and rubber mallet (photo 3). If you plan to do this backsplash project over existing tile, you will have to make some modifications. Once you're done with the 4 foot (1.2 m) row segment, apply more mastic and place more tile on the wall. If your existing backsplash is not level, the new tile won't sit right. Check out our guide to learn more about installing tile backsplash: Add tile spacers for help keeping the tile pieces lined up.
You may end up with a warped finished result, if you can get the tile to stick at all.
How to install a simple subway tile kitchen backsplash. If they do, simply make the spaces smaller, or eliminate them altogether. Stand back, look at the tiles and straighten any crooked ones. Once you're done with the 4 foot (1.2 m) row segment, apply more mastic and place more tile on the wall. Depending on the tile that is to be installed, and where it will be installed, it is sometimes approp. Want a pallet wall look, without the upkeep? Backsplash prep beating you up? Start with a focal point and use the level to make a plumb line at that spot. Make sure you are fully prepared before starting your project. The best rule for kitchen backsplash placement is to look for a natural stopping point. You'll save even more if you do it yourself instead of paying the labor costs of professional installation. Use your pencil line and bubble level to line the tile up in the middle of the backsplash, before pushing it into the mastic. If you plan to do this backsplash project over existing tile, you will have to make some modifications.
1) prepping the wall, 2) creating a layout, 3) attaching the tiles, and then 4) applying the grout and finishing. Use your pencil line and bubble level to line the tile up in the middle of the backsplash, before pushing it into the mastic. If you plan to do this backsplash project over existing tile, you will have to make some modifications. Adjust the layout to fit the space step 1: After every two or three installed sheets, tap them into the mastic with a board and rubber mallet (photo 3).
Subway Tile Backsplash Install Ana White from ana-white.com Speedtile from the home depot, self adhesive backed tiles. No need to mess with mixing grout, wiping it clean, making a mess. You'll save even more if you do it yourself instead of paying the labor costs of professional installation. 1) prepping the wall, 2) creating a layout, 3) attaching the tiles, and then 4) applying the grout and finishing. You can use tile edging trim or bullnose tile to create a distinct edge for the backsplash. Ask this old house general contractor tom silva teaches a homeowner a simple technique for tiling backsplash.subscribe to this old house: If you plan to do this backsplash project over existing tile, you will have to make some modifications. Make sure the tile is lined up properly and perfectly straight before moving on.
Depending on the tile that is to be installed, and where it will be installed, it is sometimes approp.
Learn how to install a tile backsplash. Backsplashes near the sink can be made short. You'll save even more if you do it yourself instead of paying the labor costs of professional installation. Installing a traditional tile backsplash in your kitchen requires several different items. Mark vertical lines using a level to determine the layout of the backsplash tiles. Continue this process until you've covered the majority of your drywall with complete tiles. Eventually, on edges that butted up to a cabinet or window where tiles needed to be cut to fit, we ended up leaving an uneven gutter and assumed it wasn't a big deal since we'd be filling the gaps with grout or caulk later. Once you're done with the 4 foot (1.2 m) row segment, apply more mastic and place more tile on the wall. To install a mosaic tile backsplash in a kitchen: Backsplashes placed near the cooking range typically go all the way up to the bottom end of the overhead cabinets. The materials you need to have prepared before you begin include your tile, tile adhesive, and grout. Starting in the center, use a putty knife to apply just enough tile mastic to attach one tile to the wall. The first tile will make the base for the rest of your backsplash, so it needs to be placed perfectly.